Page 10 - Shimadzu Journal vol.2 Issue3
P. 10
New Technology


                Adoption of a 10 MN Fatigue Testing Machine to Expand the Evaluation
                Ability of Composite Materials for Aerospace Structure


            Sunao Sugimoto
            Advanced Composite Research Center, Institute of Aeronautical Technology, Japan Aerospace Exploration Agency


            In recent years, there has been a rapid increase in applications for carbon   we succeeded in very accurately predicting, within a 1 % margin of error,
            fiber reinforced plastics and other composite materials for commercial   the load at which delamination will start at the end of the stringers.
            passenger aircraft. Even as much as half of the weight of some aircraft
                                                               As shown in Fig. 2, the need for the testing of large-scale samples that
            being used today consists of composite materials. When building aircraft,
                                                               simulate aircraft structures has been felt both within and outside JAXA. In
            not only do strict safety requirements need to be met, but the need for
                                                               particular, in order to perform a compression test, a large-scale
            lightness also should be satisfied. For these reasons, there is little leeway
                                                               anti-buckling jig needs to be placed around the test sample, and in many
            when it comes to safety as compared with other structures. The
                                                               cases, the space between the columns of the testing machine needs to be
            Composite Materials Handbook-17 (CMH-17) provides information and
                                                               quite wide. Additionally, in the area of research and development for
            guidance necessary to design and fabricate aircraft structure from
                                                               rocket structure, there is a need for load tests that can handle a portion of
            composite materials.
                                                               a full-scale structure. Moreover, due to the increasing size of test samples
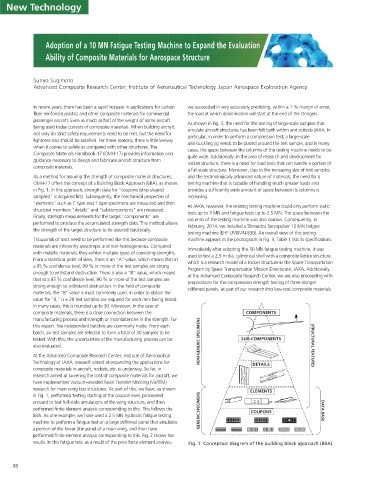
            As a method for assuring the strength of composite material structures,   and the technologically advanced nature of materials, the need for a
            CMH-17 offers the concept of a Building Block Approach (BBA), as shown   testing machine that is capable of handling much greater loads and
            in Fig. 1. In this approach, strength data for "coupons (strip-shaped   provides a sufficiently wide amount of space between its columns is
            samples)" is acquired first. Subsequently, the mechanical properties of   increasing.
            "elements" such as C type and T type specimens are measured and then
                                                               At JAXA, however, the existing testing machine could only perform static
            structural members "details" and "subcomponents" are measured.
                                                               tests up to 3 MN and fatigue tests up to 2.5 MN. The space between the
            Finally, strength measurements for the target "components" are                                                                                                                                   600 kN
                                                               columns of the testing machine was also narrow. Consequently, in                                                                              (Initiation)
            performed to produce the accumulated strength data. This method allows
                                                               February, 2014, we installed a Shimadzu Servopulser 10 MN fatigue
            the strength of the target structure to be assured statistically.
                                                               testing machine (EHF-UV8MN-830). An overall view of this testing
            Thousands of tests need to be performed like this because composite   machine appears in the photograph in Fig. 3; Table 1 lists its specifications.
            materials are inherently anisotropic and non-homogeneous. Compared
                                                               Immediately after adopting this 10 MN fatigue testing machine, it was                                                                         685 kN
            with metallic materials, they exhibit multiple types of coexisting strengths.
                                                               used to test a 2.5 m dia. cylindrical shell with a composite lattice structure,
            From a statistical point of view, there is an "A" value, which means that at
                                                               which is a research model of a rocket structure in the Space Transportation
            a 95 % confidence level, 99 % or more of the test samples are strong
                                                               Program by Space Transportation Mission Directorate, JAXA. Additionally,
            enough to withstand destruction. There is also a "B" value, which means
                                                               at the Advanced Composite Research Center, we are also proceeding with
            that at a 95 % confidence level, 90 % or more of the test samples are
                                                               preparations for the compression strength testing of three stringer
            strong enough to withstand destruction. In the field of composite
                                                               stiffened panels, as part of our research into low-cost composite materials.
            materials, the "B" value is most commonly used. In order to obtain the
            value for "B," n = 29 test samples are required for each item being tested.
            In many cases, this is rounded up to 30. Moreover, in the case of
            composite materials, there is a close connection between the           COMPONENTS
            manufacturing process and strength or inconsistencies in the strength. For
            this reason, five independent batches are commonly made. From each
            batch, six test samples are selected to form a total of 30 samples to be
            tested. With this, the uncertainties of the manufacturing process can be   NON-GENERIC SPECIMENS  SUB-COMPONENTS
            also evaluated.                                                                             STRUCTURAL FEATURES
            At the Advanced Composite Research Center, Institute of Aeronautical
            Technology of JAXA, research aimed at expanding the applications for     DETAILS
            composite materials in aircraft, rockets, etc. is underway. So far, in
            research aimed at lowering the cost of composite materials for aircraft, we
            have implemented Vacuum-assisted Resin Transfer Molding (VaRTM)
            research for main wing box structures. As part of this, we have, as shown   ELEMENTS
            in Fig. 1, performed testing starting at the coupon level, proceeded
            onward to test full-scale simulations of the wing structure, and then
            performed finite element analysis corresponding to this. This follows the   GENERIC SPECIMENS  COUPONS  DATA BASE
            BBA. As one example, we have used a 2.5 MN hydraulic fatigue testing
            machine to perform a fatigue test on a large stiffened panel that simulates
            a portion of the lower skin panel of a main wing, and then have
            performed finite element analysis corresponding to this. Fig. 2 shows the
            results. In this fatigue test, as a result of the prior finite element analysis,   Fig. 1  Conceptual diagram of the building block approach (BBA)


     88

