Page 8 - Shimadzu HMV-G Series
P. 8
global w430×h280
Automated Testing with the Electric Stage
Edge Detection and Automatic Edge Pattern Creating Function Stage Viewer Function
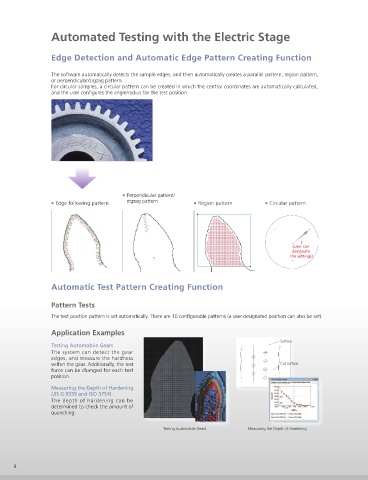
The software automatically detects the sample edges, and then automatically creates a parallel pattern, region pattern, The overall image of a large sample can be seen by photographing
or perpendicular/zigzag pattern. speci ed ranges and then combining the images.
For circular samples, a circular pattern can be created in which the central coordinates are automatically calculated, Double-click in the window to move the XY stage to that position.
and the user con gures the angle/radius for the test position.
Electric Micrometer (Optionally Available) NEW
The electric XY stage function can be used by replacing the micrometer head on the HMV-G31 manual stage.
It can be installed in existing HMV-G21/HMV-G31 systems.
Note: XY directions only. There is no electric micrometer for the Z axis direction.
Electric Micrometer (Replaces the micrometer head)
˔ Perpendicular pattern/ Motor Driver
˔ Edge following pattern zigzag pattern ˔ Region pattern ˔ Circular pattern
USB
Cable
r
(User can
designate Operated by the software
the settings)
HMV-G Software
HMV-G31
(Or the HMV-G21)
USB Cable
Automatic Test Pattern Creating Function (For communications
with the main unit /
camera) PC (Desktop or laptop)
Pattern Tests
Specifications
The test position pattern is set automatically. There are 10 con gurable patterns (a user-designated position can also be set).
Suitable Hardness Tester and XY Stage Manual XY stage provided as standard with the HMV-G31 and HMV-G21 (Surface area: 100 × 100 mm)
Application Examples Drive Method Stepping motor drive; open loop control
Surface
Testing Automobile Gears Stroke ±12.5 mm (0 to 25 mm) for both the X axis and Y axis
The system can detect the gear Movement Speed 2 mm/s max.
edges, and measure the hardness Positioning Accuracy 0.02 mm / 10 mm
within the gear. Additionally, the test Cut surface
force can be changed for each test Backlash during Round Trip Turnback 0.003 mm max.
position. Movement Resolution 0.001 mm
Measuring the Depth of Hardening Power Supply Single-phase 100 VAC 100 VA (50 Hz/60 Hz)
(JIS G 0559 and ISO 3754) Note: Prepare a grounded outlet. (D type ground, with a ground resistance of 100 max.)
The depth of hardening can be Note: In addition, a power supply for the hardness tester unit and the PC will be required.
determined to check the amount of Personal Computer As per the recommended PC speci cations for the HMV-G.
quenching. OS Windows 10 (64 bit edition)
®
®
CPU (recommended) Intel Core i5-6500 or faster (Windows 10)
®
™
One USB 2.0 port (full speed) is used. (In addition, the tester unit uses two ports.)
Testing Automobile Gears Measuring the Depth of Hardening
HMV-G
Micro Vickers Hardness Tester
8 9

