Page 6 - Shimadzu HMV-G Series
P. 6

global w430×h280


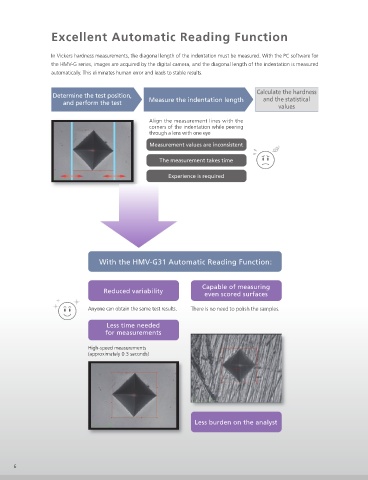
                  Excellent Automatic Reading Function                                                                                     Select the Type to Suit the Objective


                  In Vickers hardness measurements, the diagonal length of the indentation must be measured. With the PC software for      High Resolution Color Camera Type                   NEW
                  the HMV-G series, images are acquired by the digital camera, and the diagonal length of the indentation is measured
                  automatically. This eliminates human error and leads to stable results.                                                  If visual inspection of the surface color is required in order to check the condition of the sample surface before testing,
                                                                                                                                           the sample can be positioned in the hardness tester, the sample surface can be checked, and then the sample can be
                                                                                                                                           tested as is.
                                                                                      Calculate the hardness
                   Determine the test position,                                         and the statistical                                        The number of             Photograph a wide range with the approx. 5 megapixel
                      and perform the test        Measure the indentation length                                                                                             camera.
                                                                                             values                                               lenses is reduced
                                                                                                                                                                             Built-in digital zoom function enables photographing  ne
                                                  Align the measurement lines with the                                                                                       details.
                                                  corners of the indentation while peering                                                     Used like a microscope        Make observations in color to assess the characteristics of
                                                  through a lens with one eye                                                                                                samples.
                                                   Measurement values are inconsistent                                                     Examples of a Colored Image
                                                                                                                                           (Surface-treated metal sample)
                                                      The measurement takes time


                                                         Experience is required


                                                                                                                                                                           Photograph Taken with the Color Camera  Photograph Taken with the Monochrome Camera
                                                                                                                                           Digital Zoom Function: With the zoom, even fine details can be observed,
                                                                                                                                                                   with 1/2× wide range observations.


                                  With the HMV-G31 Automatic Reading Function:


                                                                    Capable of measuring                                                                2×                             1×                             1/2×
                                   Reduced variability               even scored surfaces

                                                                                                                                              Stand-Alone Model (HMV-G30)
                              Anyone can obtain the same test results.  5IFSF JT OP OFFE UP QPMJTI UIF TBNQMFT
                                                                                                                                              A color touch panel has been adopted, so the user can easily set the conditions, measure the indentation length,
                                                                                                                                              and display the results. There is no need to connect to a PC.
                                    Less time needed
                                    for measurements

                              High-speed measurements
                              (approximately 0.3 seconds)


                                                                                                                                              In standard testing mode, sample   Using the digital micrometer head, the   The system is equipped with a test
                                                                                                                                              information, shape correction, pass/fail   G30 series can make depth of hardening   conditions assist function that determines
                                                                                                                                              determinations and other detailed conditions   graph measurements.  the optimal lens or the optimal test force
                                                                                                                                              can be set before testing.                               from the anticipated hardness.
                                                                                                                                              Additionally, fracture toughness tests are
                                                                  Less burden on the analyst                                                  supported.


                                                                                                                                                                                                                                HMV-G
                                                                                                                                                                                                                             Micro Vickers Hardness Tester
      6                                                                                                                                                                                                                                        7
   1   2   3   4   5   6   7   8   9   10   11