Page 29 - Automotive Solution for Automotive
P. 29
Reducing Weight


 Clarifying the Fracture Mechanism of Composite Materials  Strength Evaluation Technique Helps Improve Accuracy of
 – Observing the Fracture Process of CFRTP Materials –  CAE Analysis for Composite Materials

            – In-Plane and Out-of-Plane Shear Properties of Thermoplastic CFRP Materials –

 Carbon fiber reinforced thermoplastic (CFRTP) materials offer excellent workability, mass producibility, and recyclability. Consequently, they are expected to   In recent years, automotive manufacturers have been considering the use of carbon fiber reinforced thermoplastics (thermoplastic CFRP) for automotive
 replace metals and other conventional materials in general purpose transportation equipment and especially in mass produced automobiles. However, due   structural materials, where high strength and durability are required, due to the higher specific strength and superior workability and formability of
 to an inadequate understanding of the internal fracture mechanisms that occur during the deformation process associated with the static strength, fatigue   thermoplastics compared to conventional materials.
 strength, and various other properties of CFRTPs, discussions about evaluating the safety of CFRTP have not progressed. Therefore, the following describes   Unlike conventional homogeneous materials, anisotropic thermoplastic CFRP composite materials exhibit a complex fracture behavior due to tension,
 a combination system able to observe internal damage in test specimens as loads are applied, which is useful for determining CFRTP fracture mechanisms.  compression, bending, in-plane shear, out-of-plane shear, or a combination thereof, depending on the principle axis and direction of the stress applied.
            Therefore, those performing evaluation testing for product design purposes by CAE, for example, have been highly demanded test methods that is able to
 Description  evaluate and validate reliably the respective types of fracture behavior.
 Fatigue Testing Inside an X-Ray CT System  In-Plane Shear Test—Using Virtual Strain Gauges (DIC Analysis) to Evaluate Localized Strain Dependence

 Observing Progression of Fatigue Cracking
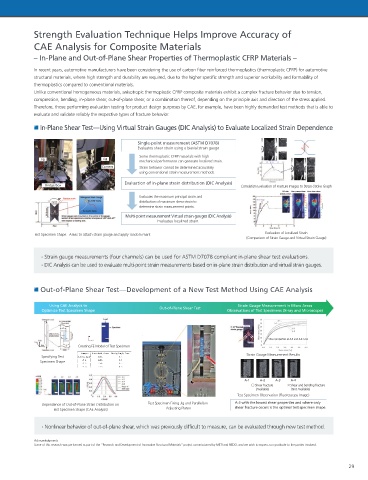
 During Fatigue Test of Aluminum Test          Single-point measurement (ASTM D7078)
 Specimen                                      Evaluates shear strain using a biaxial strain gauge
                                               Some thermoplastic CFRP materials with high
 This system is able to capture CT images of test   Jig  Jig
                                               mechanical performance can generate localized strain.
 specimens mounted in a fatigue testing machine   Camera  Strain behavior cannot be determined accurately
 (air servo).                                  using conventional strain measurement methods.
 Note: Tests are paused during CT scanning.
                                          Evaluation of in-plane strain distribution (DIC Analysis)
                Bridge box                                                       Correlation Evaluation of Fracture Images to Stress-Stroke Graph
                                                                                               DIC data  Max. principal strain Max. shear strain
                                                                                              analysis position
 inspeXio SMX-225CT HR Plus  Fatigue cracking  (progressive cracking)  (prior to fracture)  Evaluates the maximum principal strain and
 (initial onset)                               distribution of maximum shear strain to
                                               determine strain measurement points.
 Tensile and Compression Testing Inside an X-Ray CT System  Multi-point measurement Virtual strain gauges (DIC Analysis)
                                                     Evaluates localized strain.
 Deviation angle [deg]
            Test Specimen Shape   Areas to attach strain gauge and apply random mark     Evaluation of Localized Strain
                                                                                   (Comparison of Strain Gauge and Virtual Strain Gauge)

               · Strain gauge measurements (four channels) can be used for ASTM D7078 compliant in-plane shear test evaluations.
               · DIC Analysis can be used to evaluate multi-point strain measurements based on in-plane strain distribution and virtual strain gauges.
 (after applying tension)  (before applying tension)
 Felt Tensile Testing Results
 Tensile Testing Machine  The results show that many fibers are oriented in the zero-degree direction (direction of tensile force)
 after applying tensile force.  Out-of-Plane Shear Test—Development of a New Test Method Using CAE Analysis
 Three-Point Bending Testing and Stress Measurement Inside an X-Ray CT System
                 Using CAE Analysis to                                          Strain Gauge Measurement in Micro Areas
               Optimize Test Specimen Shape           Out-of-Plane Shear Test  Observations of Test Specimens (X-ray and Microscope)
 Non-Planar Image  Non-Planar Image  Non-Planar Image  Non-Planar Image  Non-Planar Image
 Indenter

 Test
 specimen                                                                                 Shear properties at A-3 and A-4: Low
 Damage
 Load cell  depth          Creating FE Model of Test Specimen
 Frame                                                                             Strain Gauge Measurement Results
               Specifying Test
 Stroke: 0.0mm  5.22mm  6.63mm  7.23mm  8.53mm
 Three-Point Bending System  Specimen Shape
 Large stroke  Three-Point Bending Test and Observing Internal Structure of CFRTP
 The damage inside a test specimen can also be observed as a graph of stroke and
                                                                                  A-1  A-2  A-3  A-4
 stress is acquired.                                                                 Shear fracture  Shear and bending fracture
                                                                                      (Available)   (Not Available)
 This research was performed as part of the "Research and Development of Innovative New Structural Materials" project
 commissioned by METI and NEDO.                                                 Test Specimen Observation (Fluoroscopy Image)
               Dependence of Out-of-Plane Strain Distribution on  Test Specimen Fixing Jig and Parallelism   A-3 with the lowest shear properties and where only
                   Test Specimen Shape (CAE Analysis)   Adjusting Platen       shear fracture occurs is the optimal test specimen shape.
 · The combination system was created by a manufacturer specializing on X-ray CT systems and testing machines!
 · Changes in stresses experienced by test specimens and the process of internal damage progression can be observed, which   · Nonlinear behavior of out-of-plane shear, which was previously difficult to measure, can be evaluated through new test method.
 was previously difficult to do.
            Acknowledgments
            Some of this research was performed as part of the "Research and Development of Innovative Structural Materials" project commissioned by METI and NEDO, and we wish to express our gratitude to the parties involved.


 28                                                                                                                  29

