Page 33 - Automotive Solution for Automotive
P. 33
Reducing Weight  Comfort/Convenience


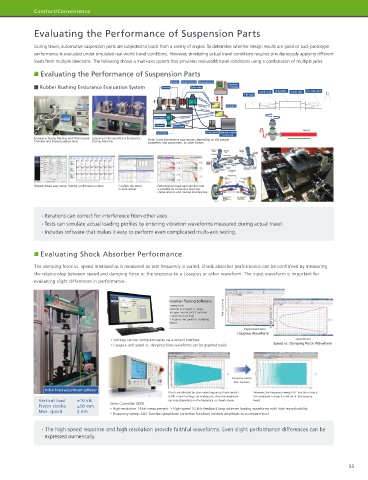
 Dynamic Tensile Testing Using a Three-Dimensional DIC Analysis System  Evaluating the Performance of Suspension Parts
 - Observation of Strain Distribution and Measurement of Strain in Polypropylene Just   During travel, automotive suspension parts are subjected to loads from a variety of angles. To determine whether design results are good or bad, prototype
   Prior to Fatigue Failure -  performance is evaluated under simulated real-world travel conditions. However, simulating actual travel conditions requires simultaneously applying different
            loads from multiple directions. The following shows a multi-axis system that simulates real-world travel conditions using a combination of multiple jacks.
 Analysis by digital image correlation (DIC) has attracted attention in recent years as a testing technique that can be used to accurately evaluate the
 static and dynamic mechanical characteristics of materials across the elastic and plastic regions. Prior to the use of DIC analysis, it was often difficult   Evaluating the Performance of Suspension Parts
 to predict the appropriate fatigue life during fatigue testing that applied dynamic test forces or strains at high speeds, due to stress concentrations in
                                                          Sample  Torque detector  Torque actuator
                                                                             Operating
 the areas measured with conventional strain measurement methods involving contact-type sensors.  Rubber Bushing Endurance Evaluation System  Bearing  Servo valve  PC software
                                                                                       Lock nut  Adjuster  Lock nut  Tie rod end
 The fatigue characteristics of such materials can now be evaluated in terms of multiple factors by installing a three-dimensional DIC analysis system in   Torque signal  Tie rod
 the fatigue testing machine.                                      Driving signal
                                                                            Controller
                                                                   Angle signal
 Dynamic (Fatigue) Tensile Testing                                  Force signal
                                                    Force detector  Driving signal
                                                             Displacement
 Instrument Used  EHF-U Hydraulic Fatigue and Endurance Testing Machine  Actuator  Servo valve  signal
 Sample  Control Method  Stress control—Upper tensile stress 20 MPa and lower tensile stress 2 MPa  Accumulator Hydraulic power  Tie rod
 Test Speed  2 Hz                                    Test frame            source unit
            Endurance Testing Machine with Thermostatic  Lateral and Torsional Force Endurance
 Strain   Q400 3D digital image correlation system  Chamber and Triaxial Loading Frame  Testing Machine  Note: Some interference may remain, depending on the sample
                                                  properties, test parameters, or other factors.
 Measurement  35 mm fixed-focus lens
 Istra4D control and analysis software for image correlation
 Cameras
 (Dantec Dynamics K.K.)
 Frame rate: 10 fps
 KFG-2-120-D16-11L1M2S strain gauge (Kyowa Electronic Instruments Co., Ltd.)
 Bridge box  (affixed to back side of sample)
 DC-97A dynamic strain gauge (Tokyo Measuring Instruments Laboratory Co., Ltd.)
 Sample  JIS K 7161 Type 1A  Wizard-driven easy setup. Setting confirmation screen.  Confirm the result   Performance wave reproduction test
 EHF-U Series  Three-Dimensional Digital Image   Polypropylene  in data viewer.  is possible by correcting response
 Hydraulic Fatigue and Endurance Testing Machine  Correlation System Setup  characteristics and mutual interference.
 Example of DIC Analysis of Fatigue  From start of test to failure  Displacement just before failure
 Virtual strain gauge   Strain distribution
 measurement point  locations extracted  · Iterations can correct for interference from other axes.
 A B C
               · Tests can simulate actual loading profiles by entering vibration waveforms measured during actual travel.
 Location extracted   · Includes software that makes it easy to perform even complicated multi-axis testing.
              Evaluating Shock Absorber Performance
 Continuous Data Acquisition  Peak-to-Peak Data Acquisition  Key Strain-Time Diagrams (Virtual Strain Gauge Measurement)
            The damping force vs. speed relationship is measured as test frequency is varied. Shock absorber performance can be confirmed by measuring
 Select data acquisition methodology  A  B  C  the relationship between speed and damping force or the response to a Lissajous or other waveform. The input waveform is important for
            evaluating slight differences in performance.
 Measure various strains or evaluate strain distribution in any location based on acquired data.

 · Enables detailed evaluation of in-plane strain during fatigue failure process.  Shock Absorber Testing Software
                                                     Frequency sweep tests
 · Enables fatigue evaluation from continuous data acquisition.  Set half-amplitude and speed in stages.  Test force (mm)
                                                     Includes auto-gain control (AGC) function
 · Enables fatigue evaluation from peak-to-peak data acquisition.  (amplitude correction function).  Damping force (mm)
                                                     Can graph Lissajous and speed vs. damping
                                                     force waveforms.
                                                                                  Displacement (mm)
 Key In-Plane Strain Distribution (Confirm Strain Concentration Locations)     Lissajous Waveform
 Static Tensile Testing  Note: The virtual strain gauge functionality included in the DIC analysis software can   • Settings can be configured easily via a wizard interface.  Speed (mm/s)
 measure displacement at any specified point on the sample observation surface.
                                      • Lissajous and speed vs. damping force waveforms can be graphed easily.  Speed vs. Damping Force Waveform
 ①  ① Near yield point  ② Near strain gauge
 ②       breakpoint
 Strain gauge
 Virtual strain gauge
                                                                              Frequency-sweep
                                                                              AGC function
 Strain gauge measurement   Initial load adjustment cylinder
 limit point (5 %)                                       If tests are affected by servo valve frequency characteristics   However, the frequency-sweep AGC function corrects
                                                         or PID control settings are inadequate, then the amplitude   the amplitude to keep it constant at all frequency
              Vertical load   ±10 kN                     can vary depending on the frequency, as shown above.  levels.
 Key In-Plane Strain Distribution  Piston stroke   ±50 mm  Servo Controller 4830
 Sample and Grips  Comparison of Stress-Strain Curves   Max. speed   2 m/s  • High-resolution 24-bit measurement  • High-speed 10 kHz feedback loop achieves loading waveforms with high reproducibility.
                                     • Frequency-sweep AGC function (amplitude correction function) controls amplitude to a constant level.
 (Comparison of Strain and Virtual Strain Gauges)
 The system can be used
 · Large-strain region that exceeds the measurement limit of the strain gauge.  for static tensile testing.  · The high-speed response and high resolution provide faithful waveforms. Even slight performance differences can be
 · Enables various strain measurements at arbitrary points and evaluation of strain distribution.  expressed numerically.


 32                                                                                                                  33

