
Page 5 - Shimadzu Xslicer SMX-6010
P. 5
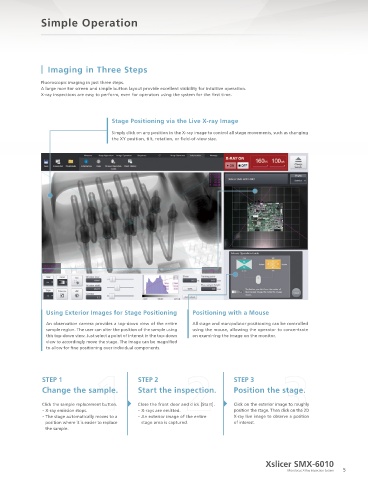
High-Accuracy Imaging  Simple Operation


 Equipped with a 3 Megapixel Flat Panel Detector  Imaging in Three Steps

 Detailed internal structure and defects can be revealed due to the 3 megapixel flat panel detector (2.3 times larger than previously).  Fluoroscopic imaging in just three steps.
               A large monitor screen and simple button layout provide excellent visibility for intuitive operation.
               X-ray inspections are easy to perform, even for operators using the system for the first time.


                                      Stage Positioning via the Live X-ray Image

                                      Simply click on any position in the X-ray image to control all stage movements, such as changing
                                      the XY position, tilt, rotation, or field-of-view size.


 1.30 Megapixel Fluoroscopic Image  3 Megapixel Fluoroscopic Image
 (Previous Shimadzu Instrument)

 New HDR Processing Function

 Shimadzu's unique, proprietary image processing technique/algorithm allows fluoroscopic images with a higher dynamic range,
 Regions that are both easy and difficult to penetrate can be observed at the same time, which shortens inspection times.


 No HDR Processing  HDR Processing


 Bright regions
 are too bright.
                Using Exterior Images for Stage Positioning      Positioning with a Mouse
                An observation camera provides a top-down view of the entire   All stage and manipulator positioning can be controlled
                sample region. The user can alter the position of the sample using   using the mouse, allowing the operator to concentrate
                this top-down view. Just select a point of interest in the top-down   on examining the image on the monitor.
 Dark regions are  view to accordingly move the stage. The image can be magnified
 too dark.      to allow for fine positioning over individual components.


 IC  Both bright and dark regions are displayed
 with the appropriate contrast.
               STEP 1                          STEP 2                         STEP 3
 HDR Processing Application Example (Left: No HDR Processing; Right: HDR Processing)  Change the sample.  Start the inspection.  Position the stage.


               Click the sample replacement button.  Close the front door and click [Start].  Click on the exterior image to roughly
               ・  X-ray emission stops.       ・  X-rays are emitted.          position the stage. Then click on the 2D
               ・  The stage automatically moves to a  ・  An exterior image of the entire   X-ray live image to observe a position
                position where it is easier to replace   stage area is captured.  of interest.
                the sample.

 Sample: Electronic Control Unit


                                                                                         Xslicer SMX-6010
 4                                                                                              Microfocus X-Ray Inspection System  5