Page 11 - Shimadzu Journal vol.6 Issue1
P. 11
Material Science


            Observation and Analysis of Inclusions with an                      Table 4   Size of Inclusions
            Electron Probe Micro Analyzer
            To examine the fractured surface condition as well as the size and kind of
            inclusions in metal materials after a fatigue test, we used the electron probe
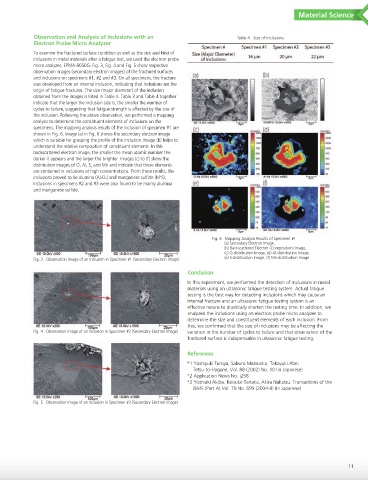
            micro analyzer, EPMA-8050G. Fig. 3, Fig. 4 and Fig. 5 show respective
            observation images (secondary electron images) of the fractured surfaces
            and inclusions on specimens #1, #2 and #3. On all specimens, the fracture
            was developed from an internal inclusion, indicating that inclusions are the
            origin of fatigue fractures. The size (major diameter) of the inclusion
            obtained from the images is listed in Table 4. Table 3 and Table 4 together
            indicate that the larger the inclusion size is, the smaller the number of
            cycles to failure, suggesting that fatigue strength is affected by the size of
            the inclusion. Following the above observation, we performed a mapping
            analysis to determine the constituent elements of inclusions on the
            specimens. The mapping analysis results of the inclusion of specimen #1 are
            shown in Fig. 6. Image (a) in Fig. 6 shows the secondary electron image
            which is suitable for grasping the profile of the inclusion. Image (b) helps to
            understand the relative composition of constituent elements. In this
            backscattered electron image, the smaller the mean atomic number the
            darker it appears and the larger the brighter. Images (c) to (f) show the
            distribution images of O, Al, S, and Mn and indicate that these elements
            are contained in inclusions at high concentrations. From these results, the
                                                      n
            inclusions proved to be alumina (Al2O3) and manganese sulfide (M S).
            Inclusions in specimens #2 and #3 were also found to be mainly alumina
            and manganese sulfide.


                                                                       Fig. 6   Mapping Analysis Results of Specimen #1
                                                                           (a) Secondary Electron Image,
                                                                           (b) Backscattered Electron (Composition) Image,
                                                                           (c) O-distribution Image, (d) Al-distribution Image,
            Fig. 3   Observation Image of an Inclusion in Specimen #1 (Secondary Electron Image)  (e) S-distribution Image, (f) Mn-distribution Image

                                                               Conclusion
                                                               In this experiment, we performed the detection of inclusions in metal
                                                               materials using an ultrasonic fatigue testing system. Actual fatigue
                                                               testing is the best way for detecting inclusions which may cause an
                                                               internal fracture and an ultrasonic fatigue testing system is an
                                                               effective means to drastically shorten the testing time. In addition, we
                                                               analyzed the inclusions using an electron probe micro analyzer to
                                                               determine the size and constituent elements of each inclusion. From
                                                               this, we confirmed that the size of inclusions may be affecting the
            Fig. 4   Observation Image of an Inclusion in Specimen #2 (Secondary Electron Image)  variation in the number of cycles to failure and that observation of the
                                                               fractured surface is indispensable in ultrasonic fatigue testing.

                                                               References

                                                               *1 Yoshiyuki Furuya, Saburo Matsuoka, Takayuki Abe:
                                                                 Tetsu-to-Hagane, Vol. 88 (2002) No. 10 (in Japanese)
                                                               *2 Application News No. i258
                                                               *3 Yoshiaki Akiba, Keisuke Tanaka, Akira Nakatsu: Transactions of the
                                                                 JSME (Part A) Vol. 70 No. 695 (2004-8) (in Japanese)

            Fig. 5   Observation Image of an Inclusion in Specimen #3 (Secondary Electron Image)


                                                                                                                    11

