Page 10 - Shimadzu Journal vol.6 Issue1
P. 10
Material Science


              Detection of Inclusions in Metal Materials Using an

              Ultrasonic Fatigue Testing System

            Fumiaki Yano and Takuo Ono, Shimadzu Corporation


                                                                                       6
                                                                                                    7
            Generally it is known that with most structural metal materials the fatigue strength lowers until a load is applied 10  times, and from 10  times onward
            the fatigue limit is reached at which no fatigue fracture will occur. However, it is also revealed that with high-strength metal materials that are hardened
            or surface treated, internal inclusions become an origin of a fatigue fracture and cause a fracture even at 10  to 10  cycles. When a fracture occurs from
                                                                                       9
                                                                                  8
            the inside, it is considered that the fatigue strength depends on the size and kind of internal inclusions. Consequently, to evaluate the fatigue strength
            of high-strength metal materials, it is important to know the size and kind of inclusions present in the metal materials. There are some methods for
            inclusion detection, such as mirror polishing and observing the surface of the specimen; however, no one can tell whether a fatigue fracture starts from
            the detected inclusion. Therefore, to detect inclusions which lead to an internal fracture, it is best to actually carry out a fatigue test . However, a
                                                                                                  *1
            fatigue test exceeding 10  loading cycles at 10 Hz will take approx. 3.2 years. The ultrasonic fatigue testing system used for this experiment enables
                             9
                                                  9
            testing at a frequency of 20 kHz, achieving a test with 10  cycles in about 14 hours. Such a system is very effective to detect internal inclusions through
            actual fatigue testing. In this experiment, we performed the detection of inclusions in an SNCM439 specimen using the ultrasonic fatigue testing system,
            USF-2000A, and observed the inclusions using the electron probe micro analyzer, EPMA, to identify their elements.
            Inclusion Detection by Ultrasonic Fatigue Testing
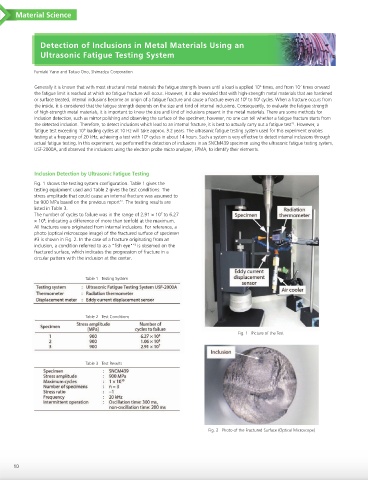
            Fig. 1 shows the testing system configuration. Table 1 gives the
            testing equipment used and Table 2 gives the test conditions. The
            stress amplitude that could cause an internal fracture was assumed to
            be 900 MPa based on the previous report . The testing results are
                                         *2
            listed in Table 3.
            The number of cycles to failure was in the range of 2.91 × 10  to 6.27
                                                      7
            × 10 , indicating a difference of more than tenfold at the maximum.
                8
            All fractures were originated from internal inclusions. For reference, a
            photo (optical microscope image) of the fractured surface of specimen
            #3 is shown in Fig. 2. In the case of a fracture originating from an
                                             *3
            inclusion, a condition referred to as a "fish eye"  is observed on the
            fractured surface, which indicates the progression of fracture in a
            circular pattern with the inclusion at the center.

                             Table 1   Testing System


                             Table 2   Test Conditions

                                                                                Fig. 1   Picture of the Test


                             Table 3   Test Results


                                                                      Fig. 2   Photo of the Fractured Surface (Optical Microscope)


      10

