Page 41 - Automotive Solution for Automotive
P. 41
Internal Combustion Engines  Failure analysis and material control


 Evaluating Parts and Materials for Increasing the Temperature and   Failure Analysis of Surface-hardened Gears
 Pressure of Engines and Exhaust Systems to Improve Fuel Efficiency  – Hardness Distribution Evaluation and Fracture Origin Analysis by Carbon Content Mapping –

 - Testing Based on a Simulated Internal Engine Environment -
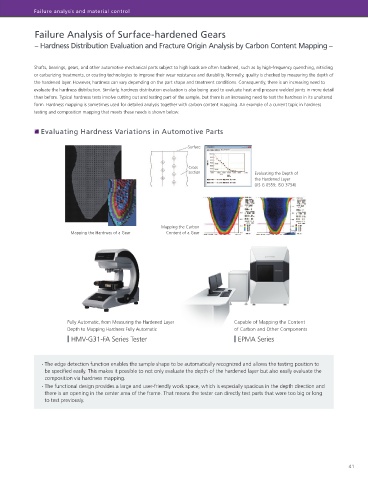
 Combustion efficiency is being improved by increasing the temperature and pressure inside the engine. Therefore, it is increasingly important to select or   Shafts, bearings, gears, and other automotive mechanical parts subject to high loads are often hardened, such as by high-frequency quenching, nitriding
 design materials that are suitable for high temperatures and pressures. In this example, thermal fatigue was evaluated to determine the performance of   or carburizing treatments, or coating technologies to improve their wear resistance and durability. Normally, quality is checked by measuring the depth of
 engine and exhaust system materials and the internal pressure fatigue was evaluated to assess pipes and other pressure-resistant parts.  the hardened layer. However, hardness can vary depending on the part shape and treatment conditions. Consequently, there is an increasing need to
            evaluate the hardness distribution. Similarly, hardness distribution evaluation is also being used to evaluate heat and pressure welded joints in more detail
 Evaluating Internal Pressure Fatigue  than before. Typical hardness tests involve cutting out and testing part of the sample, but there is an increasing need to test the hardness in its unaltered

 Pressure amplifier  form. Hardness mapping is sometimes used for detailed analysis together with carbon content mapping. An example of a current topic in hardness
 mechanism
            testing and composition mapping that meets these needs is shown below.
               Evaluating Hardness Variations in Automotive Parts
 Pressure amplifier
 mechanism
 Sample                                                        Surface


                                                               Cross
 Electric-Hydraulic   Pressurization                           section
 Fatigue Testing System  Depressurization                                            Evaluating the Depth of
 EHF-U Series  Sample                                                                the Hardened Layer
 mounting port
                                                                                     (JIS G 0559, ISO 3754)
 The pressure amplifier is used to apply pressure from inside the sample. Configured with special low-friction alloy bearings, precisely machined plungers, cylinders
 specially polished to improve durability, and a manifold, the system repeatedly applies high and forced-vacuum pressures for high-speed accelerated testing (10 Hz).

 · 300 MPa internal pressure loads can be applied     2. Multiple samples can be tested at the same time
                                                      Mapping the Carbon
 Evaluating DLC Coating Stability  Mapping the Hardness of a Gear  Content of a Gear
 – Evaluating the Physical Properties of DLC Coating Layers by Microindentation Tests –

 Diamond-like carbon (DLC) coatings are thin, but very hard and can provide high wear resistance and high
 lubricity. Consequently, the coatings are often used on engine and fuel injection parts that involve significant
 sliding. DLC coatings are applied to target part surfaces by methods such as chemical vapor deposition
 (CVD) and sputtering. Though applying a DLC coating to flat surfaces is easy, forming the coating properly
 on bumpy surfaces can be difficult in some cases. The following is an example of microindentation tests
 using a DUH series ultra micro hardness tester as one means of evaluating whether or not reliable coating
 formation can be achieved on parts with complex shape.  Dynamic Ultra Micro Hardness Testers
 DUH-211 Series
 Description
                       Fully Automatic, from Measuring the Hardened Layer      Capable of Mapping the Content
 Test Force vs. Depth Graph
 The physical properties of DLC coatings applied with different coating conditions were   Test Force vs. Depth Graph
 40                    Depth to Mapping Hardness Fully Automatic               of Carbon and Other Components
 compared. The results show the hardness and Young's modulus vary depending on the
 coating conditions.     HMV-G31-FA Series Tester                               EPMA Series
 No2   No1
 By performing tests with an indentation depth of about 1/10 the thickness of the coating
 layer, the physical properties of only the coating can be evaluated, without influence from
 the substrate material. Therefore, microindentation tests are perfect for DLC coatings only a   Test Force (mN)  · The edge detection function enables the sample shape to be automatically recognized and allows the testing position to
 few microns thick, which is commonly used in the automotive industry.
                be specified easily. This makes it possible to not only evaluate the depth of the hardened layer but also easily evaluate the
 Test Conditions   composition via hardness mapping.
 Test Mode:   Loading-unloading  · The functional design provides a large and user-friendly work space, which is especially spacious in the depth direction and
 0
 Sample Name:  DLC coating (1 µm)  Depth (µm)  0.5   there is an opening in the center area of the frame. That means the tester can directly test parts that were too big or long
 Test Load:   20 mN
 Loading Speed: 2.6 mN/sec  to test previously.
 Holding Time:  5 sec


 · Enables physical properties evaluation of only the coating layer.
 · Physical properties of DLC coating layers can be evaluated using a quick and simple method.


 40                                                                                                                  41

